


Linktree
Ever heard the phrase “link in bio”? Odds are that the link in question is accessible through Linktree, a tool that compiles social media pages, websites, and (yep, you guessed it!) newsletters, all in a single shareable landing page. Follow along with this guide to learn how you can grow your Buttondown subscriber base through Linktree.
Getting Started
Make sure that you have:
A paid Zapier account
A Linktree Pro account
A Buttondown newsletter (registration's easy, and Zapier is already included in our standard plan)
Generating Your Webhook
Create your webhook
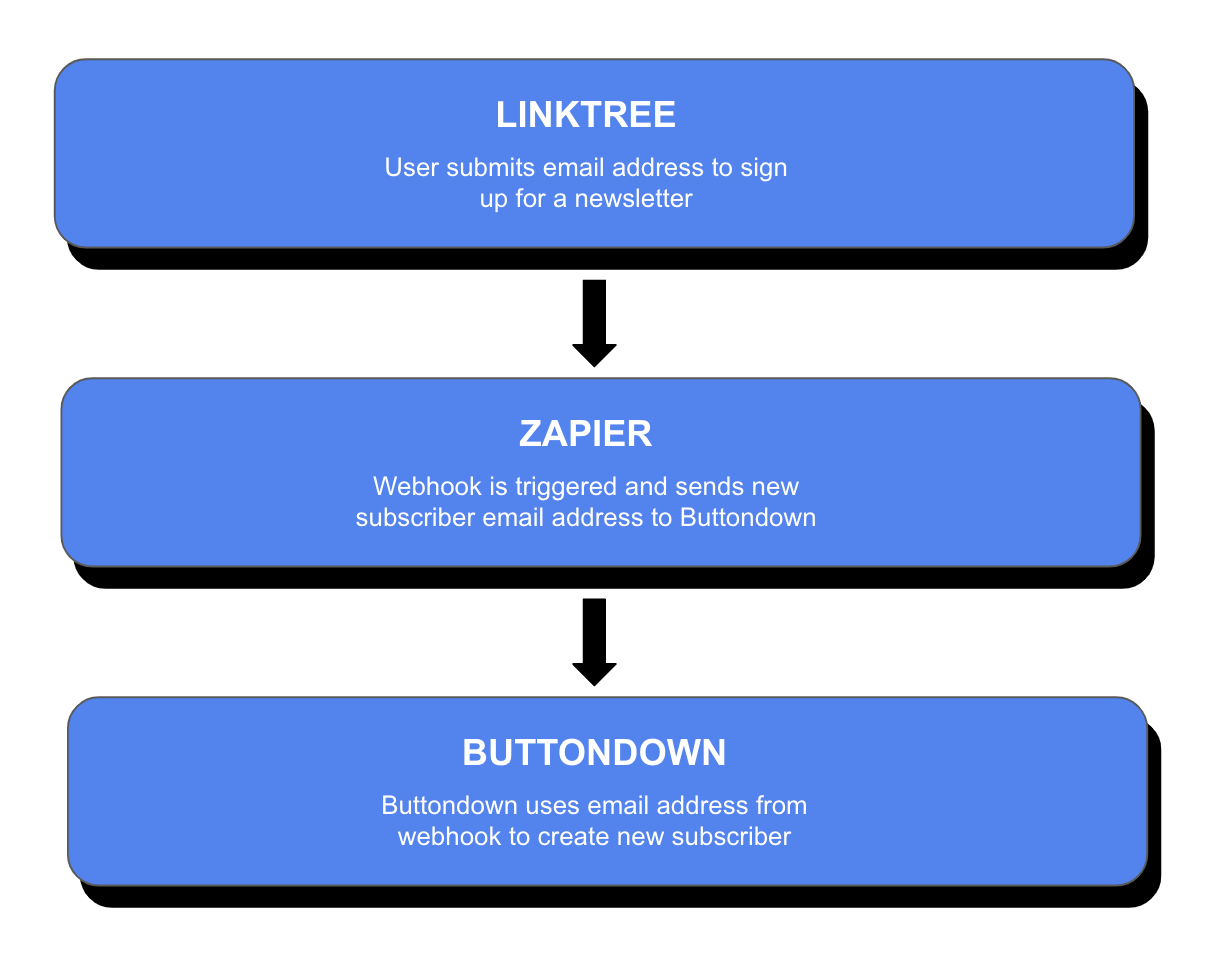
Webhooks are useful tools that can automate workflows between two or more apps. Zapier relies on webhooks to create “Zaps” (which is just a fun way of saying “automated workflows”). In this guide, we’ll be using Zapier to create a webhook that takes new subscribers’ information from Linktree and adds it to your Buttondown subscriber base.
Let’s get started. Once you’re logged in to your paid Zapier account, click “Create Zap” to begin setting up your webhook.
Determine your webhook's trigger
Search for “Webhooks by Zapier” and select this as your trigger app. Then scroll through the menu of possible trigger events and select “Catch Hook.”
Testing Your Webhook
Copy and paste your webhook URL
It’s showtime! Skip down to the “Test” tab, and you should see a custom webhook URL. Copy that URL, but don’t close out of your Zapier editor just yet.
Hop over to your Linktree Pro settings and jump to the “Mailing List Integrations” section. Once you’re there, flip the switch to add an “Email Sign-Up” field. Customize your sign-up field to your heart’s content, then click the Zapier logo listed under “Storage.” The accompanying section is where you’ll paste your webhook URL. After pasting that URL, your new sign-up field should appear on the preview of your landing page.
Test your webhook's trigger
Now it’s time to trigger your webhook. You’ll do this by navigating to your updated Linktree landing page and populating your new sign-up field with a test email address. This test email address must be a real email address, as Buttondown may not recognize it otherwise.
When you’re back in Zapier, click “Test Trigger.” Within a moment or two, Zapier should let you know that they’ve found a request that includes your test email address.
Finalizing Your Webhook
Determine your webhook's action
Woohoo! You’re well on your way to finalizing your webhook. Next up, you’ll determine the action that your webhook will complete after it’s triggered.
Start by searching for the latest version of “Buttondown” and selecting it as your action app. Then scroll through the menu of possible action events and select “Create Subscriber.”
Connect your Buttondown account
At this stage, if you haven’t already integrated your Buttondown account with Zapier, you may be prompted to sign in to your Buttondown account with your API Key. You can always access your API key in the “API” section of your Buttondown settings.
Inform your webhook's action
From here, you can select the data that your webhook will deliver to Buttondown. Select “Email,” but feel free to include as many other options as you’d like.
Test your webhook's action
This is it: The moment of truth. Click “Test Action,” and within a few seconds, Zapier should send you a result featuring your trusty test email.
We’re almost there—we’ve just got one last thing to do. Pop over to your “Subscribers” page in your Buttondown settings. You should see your test email here as well.
How exciting! That means your webhook is up, running, and ready to be published.
Publish your webhook
You’ve done it! Click “Publish your Zap” and marvel at the wonders of automated workflows.
Going the Extra Mile
Add tags and metadata
Webhooks can really do it all—including adding tags and metadata to new subscribers.
Tags can be used to sort your subscriber base, as well as to send out targeted email blasts. Like tags, metadata can also provide additional context for subscribers. That context can come in handy when you’re searching for a specific set of subscribers.
So, how do we add tags and metadata to webhooks? In this case, start by scrolling down to the “Action” tab in your Zapier editor. From here, you can populate the “Tag” and “Metadata” sections. Just make sure to double check that any new tags and metadata show up when you test your webhook action!
After testing your webhook's action in Zapier, your new subscriber (along with their tags and metadata) should appear in your Buttondown subscriber base. Toggle to the “Notes” for any given subscriber to manage tags, metadata, and other details.
And voila! On top of sending new subscribers to Buttondown, your webhook will now also help you sort them into your subscriber base.